reveals the first month's cards!!!
Please join me in welcoming these creative ladies to the team for APRIL, MAY and JUNE...
~DIANA
~SAMANTHA
~CEAL
~TENIA
~SANDIE
Thanks so much ladies for accepting and I'm sure everyone is excited to see your cards, starting TOMORROW!!!!!! Wahoo!!!

Tuesday, March 31, 2009
Oh my goodness! I didn't pick a FEB winner!
Someone asked who the winner was for FEB and I couldn't believe I FORGOT to post the FEB winner!!!!! Please forgive me ladies!!! I don't know HOW I forgot that!!! Oh dear!
So, here is the winner FINALLY for FEBRUARY..........
..........
.............
FABRICBUTTERFLY!!! Please email me with your address and I'll get something out to you ASAP
So, here is the winner FINALLY for FEBRUARY..........
..........
.............
FABRICBUTTERFLY!!! Please email me with your address and I'll get something out to you ASAP
Sunday, March 1, 2009
Christmas Card Challenge for MARCH!
Sorry this is late today, ladies!!! I was gone ALL weekend to a crop and it was so much fun!!! It was the first ever crop for me!!! I am certainly going to go again when the opportunity arises!
*Remember, if you do 5 cards this month following this challenge, your name will go in for a draw for a prize at the end of MARCH! (this challenge CAN be combined with any other blog or forum challenges that you do this month.)
YOU NEED TO LET US KNOW IN THIS POST WHEN YOU HAVE COMPLETED THE 5 CARDS IN ORDER TO BE ELIGIBLE FOR THE MONTHLY PRIZE.
I haven't had a chance yet to go through all the entries for Feb yet, so the announcement of the winner will come later (in a day or so)
But...In the meantime, let's get going on the MARCH challenge!
Since this is the month of the lucky leprechauns and Spring I thought it would be fun to create an all (or mostly) green Christmas card and include some kind of leaf on it. (for eg. a holly leaf)
Here are the design team creations:


Leave a comment if you do our challenge!
*Remember, if you do 5 cards this month following this challenge, your name will go in for a draw for a prize at the end of MARCH! (this challenge CAN be combined with any other blog or forum challenges that you do this month.)
Please upload your cards to your blog, a gallery, or photobucket and remember to give us the EXACT links to see them.You can do 5 of the same cards or 5 different ones (as long as they follow the current challenge) If you do 5 of the same, please show us a pic of them altogether. Thanks!
YOU NEED TO LET US KNOW IN THIS POST WHEN YOU HAVE COMPLETED THE 5 CARDS IN ORDER TO BE ELIGIBLE FOR THE MONTHLY PRIZE.
Monday, February 9, 2009
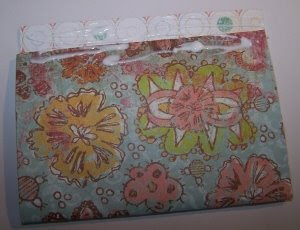
Paper Bag Mini-Album
Today I have a mini-paper bag album for you!
These bags are approx 6 1/2 x 3 1/2 inches.

I used 4 bags. You can use less. I wouldn't recommend more as it will get too bulky.


These bags are approx 6 1/2 x 3 1/2 inches.
I used 4 bags. You can use less. I wouldn't recommend more as it will get too bulky.
Fold the bags in half. Then stack them together. I alternate them, so that the openings are not all together. If you put them together all the same way, then one half of the album will be thicker than the other. All the bottoms will be on one side, and the openings will be on the other. In alternating them, the album is evened out.
Staple the bags together and glue a piece of paper to cover the staples OR you can punch holes and add ribbon and tie them together.
Now the fun really begins! Time to play with the cover and pages inside. Here's what I did...


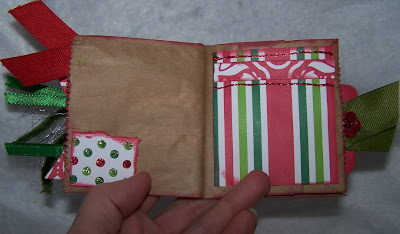

The places where the bag opens, I made extra spaces to pics or journalling. These are the tags I made:
Monday, February 2, 2009
WINNER for JANUARY is...
...
...
...
...
BARBIE391!!!!!!!!!!!!!!!!!!!!!
BARBIE, please email me with your address so I can get a little RAK in the mail to you!!!!
Thanks to each and every one fo you who participated and made 5 Christmas cards!!! Isn't that cool! That's 5 less cards you have to worry about in December!!! So, get going on the February challenge now and remember to post HERE to let us know you completed your 5 cards for the challenge.
...
...
...
BARBIE391!!!!!!!!!!!!!!!!!!!!!
BARBIE, please email me with your address so I can get a little RAK in the mail to you!!!!
Thanks to each and every one fo you who participated and made 5 Christmas cards!!! Isn't that cool! That's 5 less cards you have to worry about in December!!! So, get going on the February challenge now and remember to post HERE to let us know you completed your 5 cards for the challenge.
More Christmas HEARTS
The 'gang' was on a roll with my February Valentine turned Christmas Challenge so here are some more cards we've done with HEARTS for inspiration :)
Alecia

Betty Ann
Noreen
Lisa
Alecia


Betty Ann

Noreen

Lisa

Sunday, February 1, 2009
February Valentine's gone Christmas Challenge.......
With February being the month for Valentine's I thought it would make a nice challenge for Christmas. So ladies, get out your PINK, RED and WHITE papers....and let's see a Christmas Cards come of it.
I'd also like to see you throw in a heart or two :)
Here is one I made, adding a little heart gem in the center of one of the snowflakes.

Here are the cards the Design Team came up with. It was nice to see all the hearts :)
Denise cut out hearts and turned the upside down to make this awesome Christmas Tree for her card. Alecia

Betty Ann Lisa
Lisa Noreen
Leave a comment if you do our challenge!
*Remember, if you do 5 cards this month following this challenge, your name will go in for a draw for a prize at the end of FEBRUARY! (this challenge CAN be combined with any other blog or forum challenges that you do this month.)
Please upload your cards to your blog, a gallery, or photobucket and remember to give us the links to see them.You can do 5 of the same cards or 5 different ones (as long as they follow the current challenge) If you do 5 of the same, please show us a pic of them altogether. Thanks!
YOU NEED TO LET US KNOW IN THIS POST WHEN YOU HAVE COMPLETED THE 5 CARDS IN ORDER TO BE ELIGIBLE FOR THE MONTHLY PRIZE.
We had almost 20 participants this month! Wow!!! Let's see if we can meet and beat that number in Feb!!!!!!! Winner for Jan will be announced later today.
I'd also like to see you throw in a heart or two :)
Here is one I made, adding a little heart gem in the center of one of the snowflakes.

Here are the cards the Design Team came up with. It was nice to see all the hearts :)
Denise cut out hearts and turned the upside down to make this awesome Christmas Tree for her card.
 Alecia
Betty Ann
 Lisa
Lisa Noreen
Leave a comment if you do our challenge!
*Remember, if you do 5 cards this month following this challenge, your name will go in for a draw for a prize at the end of FEBRUARY! (this challenge CAN be combined with any other blog or forum challenges that you do this month.)
Please upload your cards to your blog, a gallery, or photobucket and remember to give us the links to see them.You can do 5 of the same cards or 5 different ones (as long as they follow the current challenge) If you do 5 of the same, please show us a pic of them altogether. Thanks!
YOU NEED TO LET US KNOW IN THIS POST WHEN YOU HAVE COMPLETED THE 5 CARDS IN ORDER TO BE ELIGIBLE FOR THE MONTHLY PRIZE.
We had almost 20 participants this month! Wow!!! Let's see if we can meet and beat that number in Feb!!!!!!! Winner for Jan will be announced later today.
Wednesday, January 14, 2009


Tuesday, January 13, 2009
Gift Card Holder-tutorial
GIFT CARD HOLDER
OK, you are probably NOT going to believe what this gift card holder is made from!!!
Yep a toilet paper roll!!! haha!
1.Flatten the tp roll as flat as you can.
2.Choose your patterned paper and cut it 4 in.X6 in. . It may have to be trimmed on the 6 in. side after you start gluing it on to the tp roll.
3. Cover one side of the tp roll with glue and adhere the pp to it. I left some for a flap. Fold the pp and put glue on the other side and this is where you may have to trim one side. 
I needed to trim mine a little.
 4. Place clamps on it for a few minutes for the glue to set.If you don't have clamps, you can just lay something heavy on it. (Just be careful because if you put too much glue on it, it will pease out and you may get it on your book or whatever you use use to hold it down.)
5. Place a line of glue on the inside of the tp roll on only ONE side. Clamp it again for the glue to set.


6.While you are waiting for this to set, you can make the tag that you can slip into the opening. Cut a piece of 4 3/4 in. x 2 in. piece of coordinating cardstock or patterned paper. Trim one side to make it look like a tag and punch a hole in it to place a piece of ribbon on the tag. Add the gift card to the tag now.


7. Now ,you can decorate the front of the gift card holder any way to choose.I chose to cover up the fold where the pp met at the top with a piece of cardstock left over from the tag and added a piece of ribbon as well. I added an embellishment and a little card with a message on it.

 8. Time to tuck the tag inside the holder and voila.You are done!
 Let me know if you try this! I would love to see it!!
Sunday, January 11, 2009
Some more Christmas Card inspiration!!!
Here are 4 more cards that Betty Ann created!!! Aren't they great!!!


Thanks Betty Ann!
Subscribe to:
Posts (Atom)