
These bags are approx 6 1/2 x 3 1/2 inches.

I used 4 bags. You can use less. I wouldn't recommend more as it will get too bulky.
Fold the bags in half. Then stack them together. I alternate them, so that the openings are not all together. If you put them together all the same way, then one half of the album will be thicker than the other. All the bottoms will be on one side, and the openings will be on the other. In alternating them, the album is evened out.

Staple the bags together and glue a piece of paper to cover the staples OR you can punch holes and add ribbon and tie them together.
Now the fun really begins! Time to play with the cover and pages inside. Here's what I did...


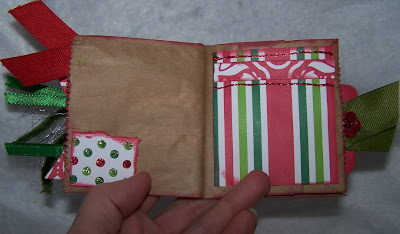

The places where the bag opens, I made extra spaces to pics or journalling. These are the tags I made:


 4. Place clamps on it for a few minutes for the glue to set.If you don't have clamps, you can just lay something heavy on it. (Just be careful because if you put too much glue on it, it will pease out and you may get it on your book or whatever you use use to hold it down.)


 8. Time to tuck the tag inside the holder and voila.You are done!
 Let me know if you try this! I would love to see it!!
 2.Using a tag punch or a tag that you have in your stash, cut out tags on each side of the top of the envelope. You may have to play with the amount of paper you want to cut away. You want it to look like a little basket or bag.
 4.Here's my gift bag that I made. Cute idea!!!


 Print off a yearly calendar.You can find these online.I used my print program I have to do it.
 Cut them and ink them with an ink color that will match you patterned paper.
 Create a small envelope to stick to the back to place the monthly cards in. I used a library pocket and trimmed it and used double-sided tape to stick it to the back of the frame.
 Adding one photo corner is a good idea so you can slip the monthly card into it without it sliding down to the bottom of the frame. A bit of stability for the card :O)
 I like adding a mini-clip that can be used to clip an impt. message there that you can see at a glance!
 Here are 2 more I did.I used scrap pieces for all 3 of them! Great way to use up some piece of patterned paper.
