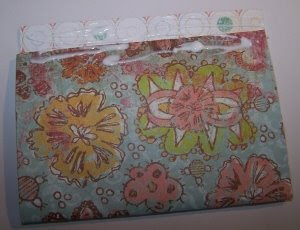
To ALL entrants, I want to let you know that I DO comment on all entries (with the exception of Splitcoast and Flickr) so if you don't see a comment from me, please check to see if there are any comments awaiting moderation or in SPAM. A lot of comments are in SPAM and bloggers don't realize it.
Showing posts with label tutorial. Show all posts

Tuesday, January 13, 2009

Gift Card Holder-tutorial


GIFT CARD HOLDER
OK, you are probably NOT going to believe what this gift card holder is made from!!!

Yep a toilet paper roll!!! haha!
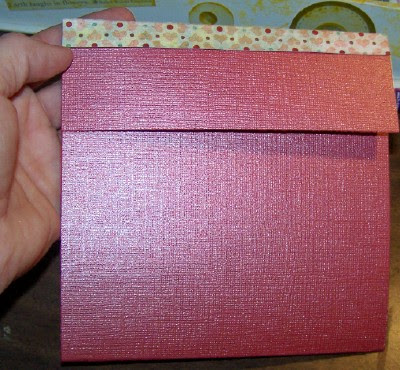
1.Flatten the tp roll as flat as you can.

2.Choose your patterned paper and cut it 4 in.X6 in. . It may have to be trimmed on the 6 in. side after you start gluing it on to the tp roll.

3. Cover one side of the tp roll with glue and adhere the pp to it. I left some for a flap. Fold the pp and put glue on the other side and this is where you may have to trim one side.

I needed to trim mine a little.
4. Place clamps on it for a few minutes for the glue to set.If you don't have clamps, you can just lay something heavy on it. (Just be careful because if you put too much glue on it, it will pease out and you may get it on your book or whatever you use use to hold it down.)
5. Place a line of glue on the inside of the tp roll on only ONE side. Clamp it again for the glue to set.
6.While you are waiting for this to set, you can make the tag that you can slip into the opening. Cut a piece of 4 3/4 in. x 2 in. piece of coordinating cardstock or patterned paper. Trim one side to make it look like a tag and punch a hole in it to place a piece of ribbon on the tag. Add the gift card to the tag now.
7. Now ,you can decorate the front of the gift card holder any way to choose.I chose to cover up the fold where the pp met at the top with a piece of cardstock left over from the tag and added a piece of ribbon as well. I added an embellishment and a little card with a message on it.8. Time to tuck the tag inside the holder and voila.You are done!Let me know if you try this! I would love to see it!!

Tuesday, December 16, 2008

Card Holder & Matching Cards/Tags

Card Holder and Matching Cards/Tags

You will need:
~6x6 page protector
~12x12 cardstock
~12x12 matching patterned paper
~your choice of embellishments (eg, brads, rubons, ribbon, flowers, ink, stamps)
~adhesives

1. Cut the cardstock down the center so you have -2- 6x12 pieces. One 6x12 piece will be used to make the card holder. Fold this in half.
Using the other piece, cut off a piece 2x6. This little piece will be used for the flap of the card holder.
The left-over will be used for a card, so cut it into a 5 1/2X 8 1/2 piece and fold it. Keep all scraps.


2. Cut the patterned paper into a 8 1/2X12 piece.Then cut this piece into -2- pieces of 5 1/2X 8 1/2 (for the cards) and fold them.Again, keep the scraps.


3. This is what you will have once you have your pieces all cut.


4. Using the piece that you cut for the card folder (6X12), glue the 2X6 piece onto it for the flap using a piece of scrap, as shown.


It will look like this.


5. Using the card pieces and scraps create any occasion cards and tags.
See samples:


6. Decorate the front of the card holder. Place the cards inside the holder and fold the flap down. Carefully slip them into a page protector ( I carefully cut the holes off the edge of the page protector to give it a neater look when finished)


I've made a few of these and given them as gifts. Great idea.

Tuesday, November 11, 2008

Pocket Card

Pocket Card
1.Cut an 8 inch diameter circle template. I find that starting with a template and playing with that helps me as I don't end up "ruining" a sheet of patterned paper. Mark the template as shown. To get the middle line (that is not quite the center of the circle, fold as shown below.
To form the pocket, fold over each edge as shown below.

2.Once you're familiar with the template, then go ahead and cut it out on your patterned paper.
3.Use the template to help you mark the back of your patterned paper.
4.Here's the patterned paper folded and inked along the edges.

5. After you have it folded, mark the places where you will punch the holes to tie it together. Then punch the holes as shown below.

6.Tie the ribbon through the holes and make a bow. Then decorate the front of the card.
7. Now you can create a bookmark for the inside of the card. Cut a piece of matching cardstock
2 1/2 in. X 5 1/2 in. Decorate as desired.8. Place the bookmark inside the card. If you like ,you can tape a gift card on the back of the bookmark :o)
...and there you have it, a pocket card! Enjoy!

Thursday, November 6, 2008

Spa Simplicity - Body Lotion


Today I thought I'd share some other little gifts I make each year for Christmas.

This one is for Body Lotion, and it is very easy to make, and fun to 'alter' the little bottles with all your little scraps :)


Also, keep watching for more little gifts for the 'Spa' :)


Body Lotion
(makes 16 ounces)

Ingredients:


1 bottle unscented white body lotion, such as shea butter
Cosmetic- grade soap fragrance
Cosmetic-grade soap colorant
3 small plastic squeeze bottles (4 ounces each)


Directions:

Carefully squeeze unscented lotion into each small bottle, filling halfway. Add 1 drop of fragrance, and 1 drop of colorant. Carefully fill bottles almost to the top. Seal with cap, and shake well to blend in scent.


You can use different scents and colours with the same unscented lotion to make a rainbow of lotions for little gifts.


Tamara...

Tuesday, October 28, 2008

Christmas Card with a Pocket!

Thanks so much to JEN of Scrap Shotz who graciously gave me permission to post this idea on the blog!! She posted this idea a couple of weeks ago at a crop and I LOVED it!

Materials you will need:
8 1/2 X 11 sheet of cardstock
Pieces of matching patterned paper
...and your regular supplies like trimmer, scissors, adhesive
...and any embellishments you will want to decorate (ribbon, brads, glitter, stickers, flowers, etc...

1.FOLD and CUT your cardstock as shown on the photo.
2. So, it will look like this (GREEN PIECE) after you have it CUT.The other piece can be used for the bookmark later.3.FOLD the triangular piece toward the back and the top piece down.4. Now flip the card over and you will see the "pocket" that will be formed by the triangular piece......and you can also see how the card will stand (like a portrait)
5. Your next step is to glue down the BOTTOM of the triangular flap to create the "pocket". This is where the bookmark will slide in.6.Now it's your turn to get all fancy-schmancy and decorate your card and bookmark! Have fun! The bookmark was cut 3 3/4 x 4 1/2 in. but you can make it thinner and longer if you wish! Totally up to you!

Of course, this card can be used for ANY holiday or occasion! Can't you see this as a great "get well" card tucked inside a book for a friend who has been feeling a little "under the weather"? She can use the bookmark as she's reading her book.
Let us know if you try it! We'd LOVE to see your card!!

Tuesday, October 21, 2008

Christmas Place Card Clips by TEZA

Christmas Place Card Clips
by TEZA

Supply List:
Adhesive – I used my Scotch ATG 714 gun and it holds great!
Large Binder Clip
Patterned paper
Coordinating ribbon
Assorted embellishments
Instructions:
We are going to be using a very simple and inexpensive piece of office supply to create a very pretty photo holder, thank you gift, center piece, wedding shower/baby shower gift...anything really, the possibilities are endless! I’ve decided to make these as place card holders for our Christmas dinner!!

Your first step will be to cut your patterned paper to 2 x3.25 inches. Next you will add adhesive to the back of your patterned paper (you can also run it through your Xyron machine). I make sure that I have almost completely covered the back side of the pp with adhesive. After you have added your adhesive you will start to wrap it around the binder clip, I start by slipping the paper under the curved ridge and lining up the pp with the edges of the clip, this will make the clip look really nice and crisp. Press the pp firmly onto the metal clip.Now that your clip is nicely covered, you can add ribbon at the top so that you can insert a photo, or a stamped images or sentiment.Embellish and you are finished!!
Let us know if you try this project! It's a beautiful Christmas craft!!!