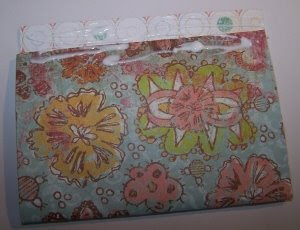
GIFT CARD HOLDER
OK, you are probably NOT going to believe what this gift card holder is made from!!!
Yep a toilet paper roll!!! haha!

1.Flatten the tp roll as flat as you can.

2.Choose your patterned paper and cut it 4 in.X6 in. . It may have to be trimmed on the 6 in. side after you start gluing it on to the tp roll.

3. Cover one side of the tp roll with glue and adhere the pp to it. I left some for a flap. Fold the pp and put glue on the other side and this is where you may have to trim one side. 

I needed to trim mine a little.

 4. Place clamps on it for a few minutes for the glue to set.If you don't have clamps, you can just lay something heavy on it. (Just be careful because if you put too much glue on it, it will pease out and you may get it on your book or whatever you use use to hold it down.)
5. Place a line of glue on the inside of the tp roll on only ONE side. Clamp it again for the glue to set.


6.While you are waiting for this to set, you can make the tag that you can slip into the opening. Cut a piece of 4 3/4 in. x 2 in. piece of coordinating cardstock or patterned paper. Trim one side to make it look like a tag and punch a hole in it to place a piece of ribbon on the tag. Add the gift card to the tag now.


7. Now ,you can decorate the front of the gift card holder any way to choose.I chose to cover up the fold where the pp met at the top with a piece of cardstock left over from the tag and added a piece of ribbon as well. I added an embellishment and a little card with a message on it.

 8. Time to tuck the tag inside the holder and voila.You are done!
 Let me know if you try this! I would love to see it!!
10 comments:
Great tutorial!! I will have to try this. I will let you know if I get it done. Thanks for the info.
Its so great to make this....I made a lot of them for Christmas too and some of them you can see on my blog...thanks so much for this tutorial
greetings Francien.
Wonderful recycle project, so pretty too!
what s great idea! thank you!
***runs off to the toilet to get some toilet rolls....**** he he
I'll post a link here when I make mine... ;)
Great idea! And easy to understand tutorial. I will definitely try this.
made mine!
here's the link
http://artycrafty.wordpress.com/2009/01/17/more-creationsmore-creations/
fabulous - I am totally saving all my tp tubes now!!
WOW, ingenious idea! SO glad I came to check this out! I have been saving tp rolls (a few anyway), to paint with and do goodness-knows-what-else-with...well, lol, now I know! THANKS!!!
That a brilliant idea thank you so much for the tutorial that's gonna be a perfect gift card holder. :)
gift delivery Philippines
Great idea for card holder
marlene
Post a Comment