Pages - Menu

Thursday, October 30, 2008

Quick Fudge Recipe

I thought I'd add something a little sweet and easy today.

Here is a recipe for Quick Microwave Fudge, and I've never had a batch fail! :)

Microwave Fudge:

3 cups Chocolate Chips
1 can Sweetened Condensed Milk
1/4 cup Butter
tsp. Vanilla

In a microwave safe bowl combine chocolate chips, milk and butter, stir and microwave on MEDIUM heat for 5 minutes, giving it a stir now and then.

Then add the vanilla and mix until the batter becomes silky and a bit stiff, a couple of minutes. Pour into a greased 8x8 pan and chill until set.

Cut into bite sized pieces and serve.

Variations:

You can use White chips, Peanut Butter chips and Butterscotch chips, as long as you have 3 cups.
Also, 1/2 cup of nuts can be tossed in the batch as well

Crushed Candy Cane is nice with White Chocolate.

Have fun :)

*edited to add a pic of the Fudge my son and his friends made to sell at his school.They donated the money to a children's charity.
Deanne

Tuesday, October 28, 2008

Christmas Card with a Pocket!

Thanks so much to JEN of Scrap Shotz who graciously gave me permission to post this idea on the blog!! She posted this idea a couple of weeks ago at a crop and I LOVED it!

Materials you will need:
8 1/2 X 11 sheet of cardstock
Pieces of matching patterned paper
...and your regular supplies like trimmer, scissors, adhesive
...and any embellishments you will want to decorate (ribbon, brads, glitter, stickers, flowers, etc...

1.FOLD and CUT your cardstock as shown on the photo.
2. So, it will look like this (GREEN PIECE) after you have it CUT.The other piece can be used for the bookmark later.3.FOLD the triangular piece toward the back and the top piece down.4. Now flip the card over and you will see the "pocket" that will be formed by the triangular piece......and you can also see how the card will stand (like a portrait)
5. Your next step is to glue down the BOTTOM of the triangular flap to create the "pocket". This is where the bookmark will slide in.6.Now it's your turn to get all fancy-schmancy and decorate your card and bookmark! Have fun! The bookmark was cut 3 3/4 x 4 1/2 in. but you can make it thinner and longer if you wish! Totally up to you!

Of course, this card can be used for ANY holiday or occasion! Can't you see this as a great "get well" card tucked inside a book for a friend who has been feeling a little "under the weather"? She can use the bookmark as she's reading her book.
Let us know if you try it! We'd LOVE to see your card!!

Thursday, October 23, 2008

Mixed Pattern Challenge

I thought I'd throw out a little challenge today.

I'd like to see you make a card using Plaid and Polka Dots together :)

I'll do a random draw for an RAK Card Kit at the end of October for those that post a link to the card they've created.


Here are a couple of cards I've done.


Have fun and Happy Carding :) ... Tamara


Tuesday, October 21, 2008

Christmas Place Card Clips by TEZA

Christmas Place Card Clips
by TEZA

Supply List:
Adhesive – I used my Scotch ATG 714 gun and it holds great!
Large Binder Clip
Patterned paper
Coordinating ribbon
Assorted embellishments
Instructions:
We are going to be using a very simple and inexpensive piece of office supply to create a very pretty photo holder, thank you gift, center piece, wedding shower/baby shower gift...anything really, the possibilities are endless! I’ve decided to make these as place card holders for our Christmas dinner!!

Your first step will be to cut your patterned paper to 2 x3.25 inches. Next you will add adhesive to the back of your patterned paper (you can also run it through your Xyron machine). I make sure that I have almost completely covered the back side of the pp with adhesive. After you have added your adhesive you will start to wrap it around the binder clip, I start by slipping the paper under the curved ridge and lining up the pp with the edges of the clip, this will make the clip look really nice and crisp. Press the pp firmly onto the metal clip.Now that your clip is nicely covered, you can add ribbon at the top so that you can insert a photo, or a stamped images or sentiment.Embellish and you are finished!!
Let us know if you try this project! It's a beautiful Christmas craft!!!

Thursday, October 16, 2008

For someone Naughty

Here is a fun little 'treat' for that naughty person on your list!


Materials needed:


cardstock
patterned paper
ribbon
embellishments
little baggie of marshmallows (3" x 4")
slot punch
score blade or bone folder

verse:

I heard that you've been naughty,
So listen, here's the scoop...
All you get for Christmas this year
Is some snowman poop!


Instructions:


Thread the ribbon through the 4 1/2" panel first, then through the closing flap to tie your pouch closed, and add patterned paper and embellishments


Have fun and let us know if you gave this a whirl!.... Tamara :)

Tuesday, October 14, 2008

Painted Snowman Jar

This project requires:
~a Mason jar (or any similar jar )
~acrylic paint (white, black, orange)
~black marker
~a piece of felt
~clear spray OR some other coating to keep the paint from scratching off. (I used "Stickles".)


I painted the jar 2X with thin layers of paint. I let them dry well before coats. The third coat was put on with a sponge, to give the jar a bit of a "bumpy" effect.


I drew out the eyes, nose and mouth with a pencil. I then painted them with a couple of thin coats. I find it is better to do several thin coats of paint as opposed to putting on one thick coat.


When that was dry, I added stitches and outlined the nose with a Sharpie Marker. I coated the whole jar with Stickles to make it sparkle and shine! It also helps to keep the paint on so it doesn't cratch off so easily.


With a strip of felt, I glued it around the top of the jar. Once that is dry, it's ready for candy, candy cane or any other gift ideas you can think to fill it!

Thursday, October 9, 2008

Petal Gift Box

HI! Ladies....

I thought some of your might like to make your own gift box. This one is just a nice size for something small.


Materials needed:


8 1/2" x 8 1/2" cardstock (bottom of the box)
8" x 8" cardstock (lid)
contrasting cardstock (lid)*double sided cardstock works well also*
Stampin' Up! 5-in-1 envelope template OR
something that you can trace to make 1 1/2" semi circles
adhesive
score blade or bone folder
embellishments of choice


Instructions:


***note....DO NOT put adhesive in the center of each piece, it will show through on your lid, as you can see on mine (blush)***


Have fun and let us know if you gave this a whirl!...Tamara :)

Tuesday, October 7, 2008

BOW TYING CHEAT-by Adrienne

Adrienne posted this tutorial on her blog HERE and I thought it was absolutely wonderful! She graciously allowed us to post it here! Thanks Adrienne!!!

*If you would like to see these pictures bigger, visit Adrienne's blog and click on the pic.It will show it larger.

So this is my Bow Tying Cheat!
1. Start with your supplies :D

2. Decide where you want your image to go.
3. Put a line of glue where you want your ribbon to cross the page (I lined my glue with white ink... I am using Tombo)
4. Start putting your ribbon across your paper but do not go all the way to the end. Stop where you want your bow to go.
5. Twist your ribbon over once and then glue the rest of it down. (If you have one sided ribbon, twist it twice (until the image shows on top again)
6. Turn card over and glue edges down if you wish.
7. Trim.
8. Look how magnificent it looks!
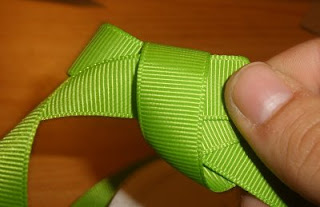
9. Now onto the actual BOW TYING!
10. Start with your loop.
11. Fold back behind.
12. Bring around over the front.
13. Go behind with it again.
14. Push through and pull.
15. This is how I mess with my bow to get the desired "ears". I have it like held between pointer finger and thumb. and then I have the ends held between random fingers and palm.
16. Once you have your desired shape. Cut off the ends. (And glue image to desired position)
17. This is my secret part... I attach the bow with a glue dot or two.
If you look close enough you can see where I put my dot!
18. Attach to card and marvel at the great bow you've just made!
Isn't it gorgeous! And look at that snowman! Sweet!!! Try a Christmas card using Adrienne's secret bow tying tricks! We'd love to see it!!!